If you’ve been reading about why fermented vegetables matter for gut health — and for men over 40 the research is genuinely compelling — the full breakdown is over at MadMadViking.
What that post doesn’t tell you is how to actually make the stuff yourself.
Store-bought refrigerated sauerkraut and kimchi work if you find the right kind — naturally fermented, live cultures, two or three ingredients on the label. But quality fermented vegetables at the grocery store run $7 to $10 a jar. Kimchi with real fermentation behind it is $8 to $12. And that’s assuming you can find them at all — most mainstream supermarkets carry almost nothing but vinegar-brined products, which deliver zero live cultures and zero gut benefit regardless of what the front of the label implies.
Homemade costs under $2 a jar, carries more live cultures than anything that’s been sitting in a distribution chain for weeks, and takes about 20 minutes of active work. The rest is just waiting.
This recipe is for one quart jar — the right place to start. Get one batch right, understand what you’re doing, and then scale up from there. The technique is identical whether you’re making one jar or six.
What You’re Actually Doing
Lacto-fermentation. The naturally occurring Lactobacillus bacteria already present on the surface of fresh vegetables multiply in a salt brine environment while harmful organisms get suppressed by the salt and the acidity those bacteria produce. No vinegar. No heat. No added cultures needed — they’re already on the vegetables.
Salt percentage is the only critical variable. The target is 2% salt by weight of your vegetables. Too low and you risk mold. Too high and you slow or stop fermentation. Weigh it — don’t guess.
Ingredients
Makes 1 quart jar
- Half a medium head of green cabbage (~1 lb / 450g)
- 1 medium carrot (~120g)
- ~12g non-iodized pickling salt (about 2 level teaspoons — but weigh it if you can)
Note on the cabbage: A full medium head will overfill one quart jar. Use the other half in coleslaw, a stir-fry, or just start a second jar while you’re at it — the technique is the same.
Equipment
What you actually need
- Wide-mouth quart mason jar — Ball Wide Mouth Quart Jars are the standard. Pick up a case — once this works you’ll want more jars.
- Kitchen scale — Strongly recommended. Measuring 12g of salt by weight is more reliable than by volume, especially on your first batch where the margin for error matters most.
- Large mixing bowl — For massaging the vegetables.
- Something to pack the jar — The back of a wooden spoon works fine for a single jar.
- Fermentation weights – These keep your cabbage below the liquid and fermenting
The lid — use an airlock
For fermentation, a standard mason jar lid works in a pinch (left on loosely to let gas escape), but an airlock lid removes all the guesswork. It lets CO2 out during active fermentation without letting air back in, which means you don’t have to check and burp the jar daily and you won’t second-guess whether it’s working.
Easy Fermenter Airlock Lids — Pack of 4 is the one I’d point you to. Amazon’s Choice, 4.6 stars, fits standard wide-mouth mason jars. The pack of 4 makes sense because once your first batch works you’ll immediately want to run more jars at once — and now you’re set up for it without buying anything else.
On salt: Use Morton Canning and Pickling Salt or fine sea salt. Iodized table salt inhibits the beneficial bacteria you’re trying to grow. This matters — don’t substitute it.
Instructions
Step 1 — Prep the Vegetables
Quarter the cabbage half, remove any damaged outer leaves (set one good leaf aside — you’ll use it), and slice out the core. Shred finely with a knife — aim for thin ribbons about ⅛ inch wide. Peel and grate the carrot. Combine in your mixing bowl.
Step 2 — Weigh and Salt
Weigh your shredded vegetables. Multiply that number in grams by 0.02 — that’s your salt target in grams. For approximately 570g of vegetables you’re looking for about 11–12g of salt.
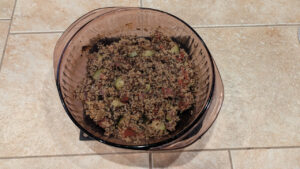
Sprinkle the salt evenly over the vegetables. Let it sit for 5 minutes, then massage firmly with both hands for 8–10 minutes. You’re working the salt into the vegetable cells to draw liquid out. Put some effort into it — you should end up with a noticeable pool of brine in the bottom of the bowl and the vegetables will have reduced significantly in volume. If you’re not seeing much liquid after 10 minutes, cover the bowl, rest for 15 minutes, then try again.
Step 3 — Pack the Jar
Add the vegetables to your clean quart jar in batches, pressing down firmly after each addition. Pack it as tightly as possible — no air gaps. The brine should rise above the level of the vegetables as you pack. This is what you want.
Once fully packed, tuck the reserved cabbage leaf over the top of the shredded mix to hold everything below the brine line. If any vegetables are still poking above the brine, mix a small amount of additional brine (½ teaspoon pickling salt dissolved in ½ cup of water) and add just enough to submerge everything. Leave about an inch of headspace at the top — the contents will expand slightly during active fermentation.
Step 4 — Lid and Wait
Attach your Easy Fermenter airlock lid according to the instructions. Set the jar on a small plate or saucer (it may bubble over slightly) somewhere at room temperature, out of direct sunlight. 65–75°F is the sweet spot. If using a standard lid instead, put it on loosely enough that gas can escape and open it briefly once a day to release pressure.
Step 5 — The Fermentation Window
- Days 1–2: Small bubbles form and the brine may turn slightly cloudy. Both are good signs.
- Day 3: Taste it. It should be getting noticeably tangy.
- Days 5–7: For most people this is the sweet spot — well-developed tang, still crunchy, full flavour without being sharp.
- Days 7–14: Tangier and more complex. Personal preference from here.
Once it tastes right, seal the jar properly and move it to the refrigerator. Cold storage slows fermentation dramatically and properly submerged fermented vegetables keep for months. At 2–3 tablespoons per day, one quart jar lasts 6–8 weeks.
Troubleshooting
White film on the surface: Kahm yeast — harmless, but means some vegetables were briefly exposed to air. Skim it off, push everything back below the brine, and continue.
Fuzzy mold (green, black, or pink): Discard and start over. Vegetables were above the brine line long enough for contamination to take hold. Common culprit is inadequate packing or not enough brine.
Not enough brine after 24 hours: Mix ½ teaspoon pickling salt in ½ cup water and add enough to bring the level above the vegetables.
Nothing happening after 48 hours: Check the temperature. Below 65°F fermentation is very slow. Move the jar somewhere warmer.
Soft texture: Fermented too warm or too long before refrigerating. Stay under 75°F and pull it into the fridge at your preferred tang level rather than waiting it out.
How to Use It
Two to three tablespoons alongside any protein at any meal is the easiest place to start. On eggs at breakfast is the lowest-friction daily habit. On a burger, with grilled meat, or mixed into a grain bowl all work. Straight from the jar as a snack is fine too. Just don’t cook it if you want the live cultures — heat kills them.
The Numbers
One jar of quality store-bought naturally fermented sauerkraut runs $7–10. One jar from this recipe costs about $0.75 for half a cabbage, $0.25 for a carrot, and a negligible amount of salt — under $1.50 total, for a fresher product with a higher live culture count than anything that’s been in a distribution chain for weeks.
The Science Behind It
Lacto-fermented vegetables carry live Lactobacillus cultures along with the prebiotic fiber that helps those bacteria survive the trip through your digestive system and make contact with your gut lining. This is why plant-based fermented foods consistently outperform fermented dairy in the gut health research — the fiber matrix is protective in a way that dairy doesn’t replicate. For the full breakdown of what the research actually says, and why men over 40 specifically benefit from prioritising this, that’s all covered at MadMadViking.
You can also grab the free Fermented Foods Protocol for Men Over 40 — the quick-reference guide to fermented foods, the label-reading cheat sheet for the grocery store, and the 30-day starter protocol — at the link below.
Get the Full Protocol
→ Download the Free Fermented Foods Protocol for Men Over 40
Cliff writes about health, cooking, and practical living at MadMadViking.com and TheDudeCooks.com.